 Learning the power of lateral and rotational ribcage rolling has led to huge recent breakthroughs for me and my clients: not just rib or spine pain relief, but massive gains in the most stubborn and longstanding hip, pelvis, and shoulder restrictions.
And just when I thought there weren’t any more feasible foam rolling strategies, I returned home for the holidays to see my mother foam rolling the front of her ribs.
Mom has restrictions in her ribcage that affect both her upper and lower body. She has benefitted from my hands-on treatments to her ribcage: the lateral ribs, sternum — the breast plate on the front of the ribcage — and the front of the lower ribcage, where the diaphragm lives.
She took it upon herself to DIY a front-of-the-ribcage mobility strategy with the foam roller. The result? Not only was it safe and tolerable for her, but it also unlocked additional mobility gains. That got me experimenting.
In last month’s article, we outlined the outsized effects thoracic spine and ribcage mobilization can have on the whole body, including:
- improved spinal mobility
- decreased neck and back pain
- the release of stubborn stiffness in the shoulders and hips.
The exercises in that article focused on the lateral and posterior lower ribs. This month, we demonstrate how to use a foam roller to mobilize the front of the ribcage — namely, the sternum and anterior diaphragm.
Working the front side also improves mobility and relieves pain. But it provides two other key benefits: enhanced posture and breath volume.

These ribcage foam rolling strategies can have great benefits for your running and general mobility. Photo: iRunFar/Eszter Horanyi
Posture and Breathing
Peak running performance requires efficient posture, or how we align and carry our body in space. Posture neutral has two components:
- a vertical stacking of the body segments, including the head, neck, trunk, pelvis, and legs
- balanced curvatures in the spine, including extension (lordosis) curvatures in the neck and lower back, and a flexion (kyphosis) curve in the thoracic spine.
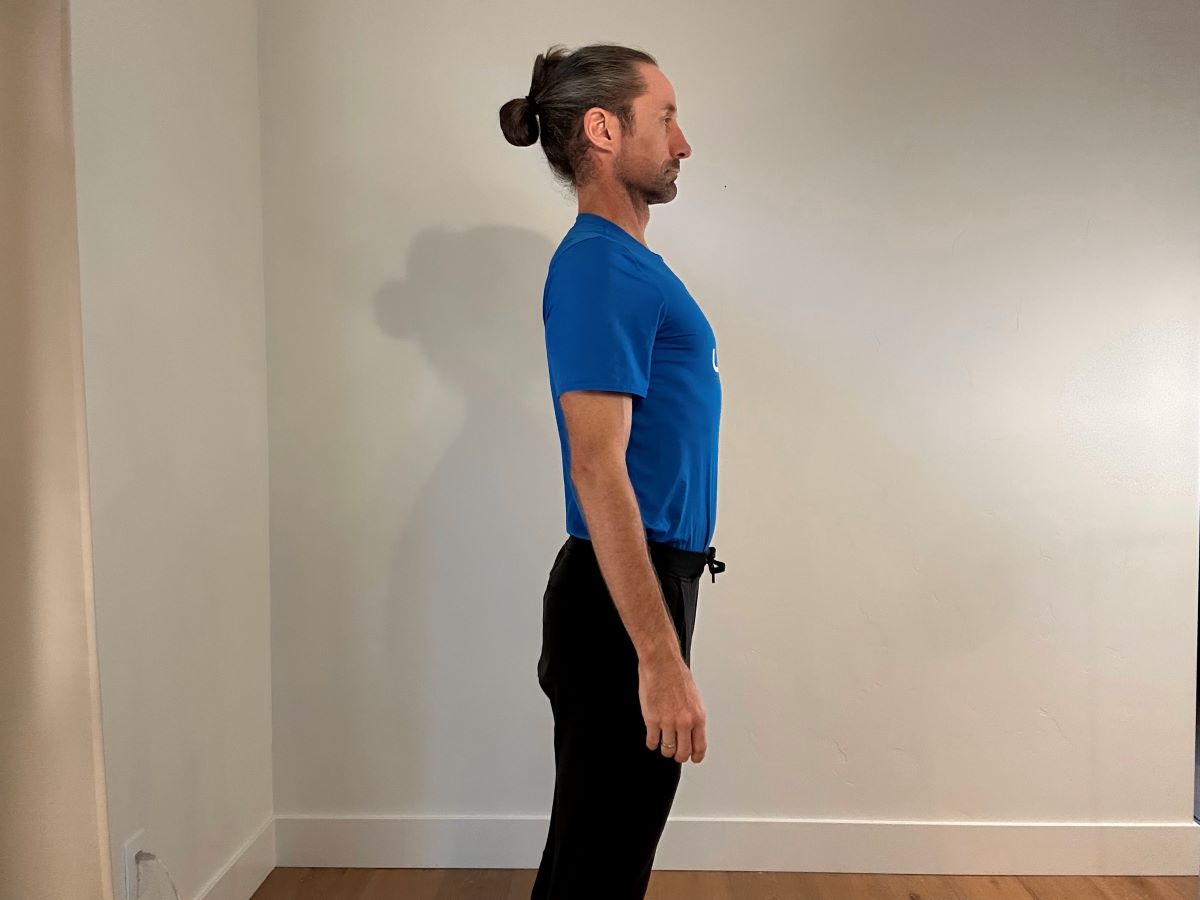
This photo demonstrates an efficient posture:

The author demonstrating posture neutral, with a balanced stacking of body segments. All photos courtesy of Joe Uhan, unless otherwise noted.
For many runners, stiffness in the trunk prevents finding and maintaining posture neutral. Those stiff trunk elements might include:
- thoracic vertebrae
- ribs
- sternum, which is the flat, shield-like bone that runs vertically in the front of the ribcage.
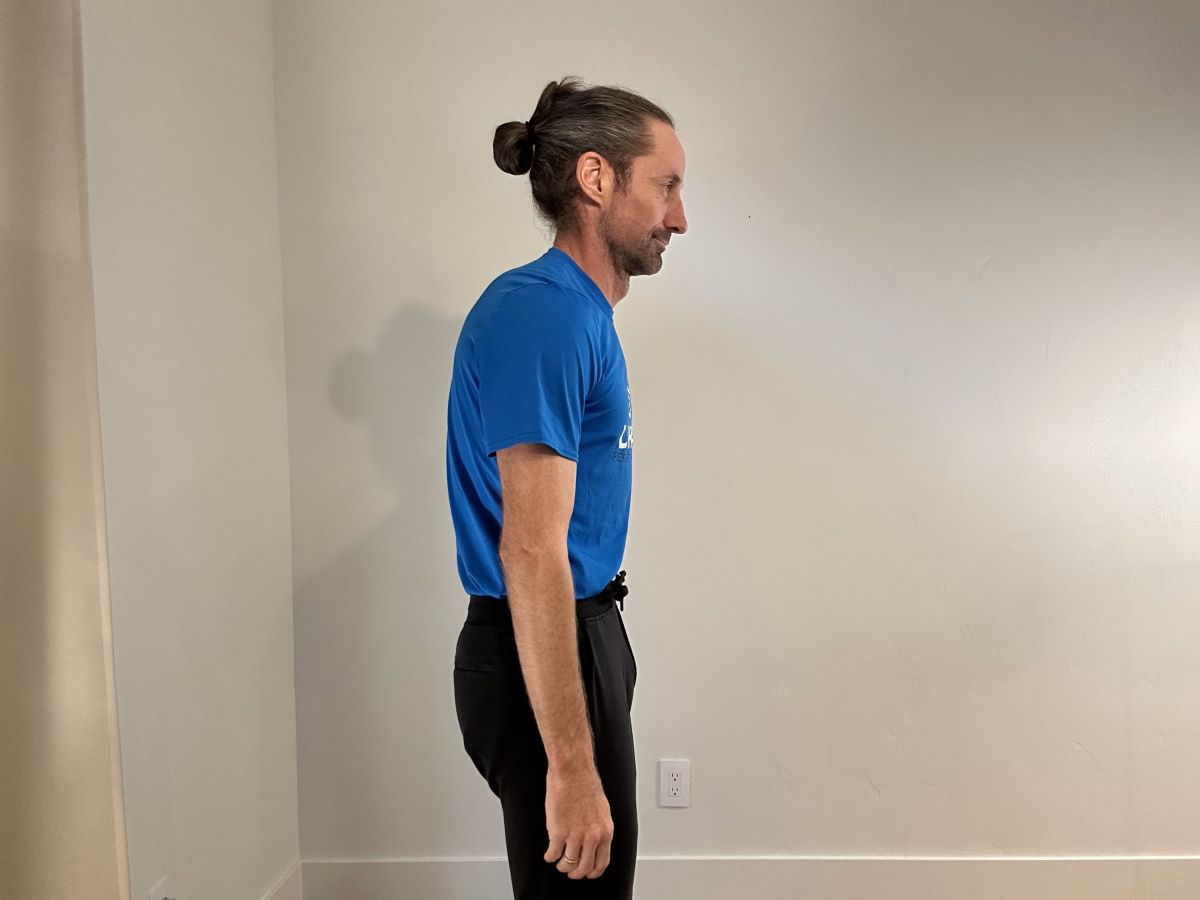
Some runners get stuck in a flexed, slouchy thoracic spine, featuring a depressed sternum, as demonstrated in this photo:
Many more runners are stuck in too much extension, with the ribs flared up and out, and the sternum stuck in elevation:
In this case, both the ribs and the sternum are held in a relative inhalation position: stuck up and out, unable to relax down into the trunk.
This posture inefficiency may look good and strong compared to excess flexion, but too much spine and rib extension has its consequences, including:
- Deficient hip mobility: Excess spinal extension puts the pelvis into excess anterior tilt, limiting hip flexion.
- Deficient breath volume: Too much extension limits 360-degree ribcage expansion, limiting both exhale and inhale volume.
- Decreased whole-body propulsion: A ribcage locked in extension limits the mobility and efficiency of the pelvis and scapulae to work together to propel at peak speed and endurance.
For those stuck in a flexed position, conventional ribcage extension strategies are useful. But if you’re like many runners, mobilizing out of extension isn’t as easy or straightforward. But with these new anterior ribcage techniques, it will be.
Pre-Treatment Mobility Testing
Once again, to determine the role that the thoracic spine might have on whole-body mobility, try the following mobility pre-tests:
- Shoulder flexion: Raise a straight arm overhead, next to your ear.
- Low back flexion and hamstring (sciatic nerve): Stand with straight knees and flex down toward your toes. Or, sitting with legs long in front of you, flex forward toward your toes.
- Hip flexion and extension: Perform a runner’s lunge stretch with one foot on a chair and the other leg straight behind.
- Inhalation volume: Standing in neutral, take as deep of a breath as possible. Hold it for one second, then fully and forcefully exhale. Note the relative length and volume of that breath.
Ribcage Mobilization Precautions
As stated in our previous article introducing advanced ribcage foam rolling strategies, placing our full body weight onto a foam roller anywhere on the ribcage is an aggressive and potentially dangerous activity.
Body weight pressure on the ribcage should be avoided in the following groups: a diagnosis of osteopenia or osteoporosis, acute lower back pain and/or lumbar spine sensitivity, and joint and connective tissue hypermobility conditions. Please consult with a licensed medical professional before performing these or any exercise programs to ensure they are appropriate for you and your body.
Advanced Ribcage Rolling Strategies
For strategies 1 and 2, check out last month’s article. The video below should help explain strategies 3 and 4, which are covered in the rest of this article.
[Editor’s Note: If you are unable to see the video above, click here to access it.]
3. Sternum on Vertical Roller
Set-up
- Gear: Obtain a low- to medium-density foam roller. Too firm may be too painful and result in guarding. The length should be at least 12 inches.
- Position and placement: Lie face down on a vertical foam roller, centered on your sternum bone, just below your chin. Then roll slightly to either side on the rib-sternal joints to find any sore or stiff spots. The head should rest straight down in neutral, with hands under the head, or in a push-up position.
To Perform
- Pin and breathe: Let your body weight sink into the roller, while breathing deeply and slowly.
- Leg rotation: Bend both knees, elevating the feet. Rotate both feet to the same direction (if offset onto the right rib-sternum joints, the stretch sensation will be more intense with both feet to the right and vice versa). Hold for one or two deep breaths, and then disengage or rotate to the other side.
Sets and Repetitions
Perform the sternal mobilization for 30 to 90 seconds, pausing to reassess for both mobility gains and soreness. Repeat as tolerated.
4. Anterior Diaphragm Mobilization
Set-up
- Gear: Obtain a low- to medium-density foam roller. The ideal length is 18 to 36 inches.
- Position and placement: Lie face down, with the horizontal foam roller positioned near the bottom of the ribcage and sternum, just below the nipple or breast, but still fully contacting the central lower ribs. The head should rest straight down in neutral, with hands under the head, or in a push-up position.
To Perform
- Pin and breathe: Let your body weight sink into the roller while breathing deeply and slowly. Focus on allowing both the sternum and pelvis to relax down and the foam roller to sink in.
- Leg rotations: Bend both knees, elevating the feet. Rotate both feet in the same direction, while keeping the lower ribs in contact with the roller. Hold for one or two deep breaths, and then disengage or rotate to the other side.
Sets and Repetitions
Perform the sternal mobilization for 30 to 90 seconds, pausing to reassess for both mobility gains and soreness. Spend additional time in one or both rotations, as needed.
Post-Treatment Testing
Retest your pre-test motions and breath size. The larger the change in motion, the more relevant ribcage rolling may be.
Conclusion
When it comes to peak efficiency and performance in running, there are two truths:
- We run with our whole body
- We need to care for our body in all three dimensions.
More than just breathing and organ transport, the thoracic spine is a key engine to running. A 360-degree approach — treating the whole circumference — is our best bet to unlock and enhance not just the ribcage, but the whole body. Just as it is central to our body, keep thoracic spine efficiency in the center of your mobility routine!
Call for Comments
- Did you find these techniques useful?
- Did you try the foam rolling techniques in last month’s article also?


