
Like this article? Check out our book “Where the Road Ends!”
Welcome to this month’s edition of “Where the Road Ends: A Guide to Trail Running!” That’s the name of both this column and the book Meghan Hicks and Bryon Powell of iRunFar published in 2016. The book Where the Road Ends: A Guide to Trail Running is a how-to guide for trail running. We worked with publisher Human Kinetics to develop a book offering the information anyone needs to get started, stay safe, and feel inspired with their trail running. The book Where the Road Ends teaches you how to negotiate technical trails, read a map, build your own training plan, understand the basics of what to drink and eat when you run, and so much more.
This column aims to do the same by publishing sections from the book as well as encouraging conversation in the comments section of each article. We want you to feel inspired and confident as you take on your first few trail runs as well as connected to iRunFar’s community of trail runners!
In this article, we excerpt from Chapter 2 to discuss how to develop and effective trail runner’s body. In short, we feel there are four parts to a trail runner’s body that are a little different from other kinds of running: you pick up your feet a little higher, your cadence is sometimes faster, you run ready for whatever obstacles come, and you walk when you need to. Let’s look at these four ideas.
Picking Up Your Feet
One quick adjustment you can make as a new trail runner to save some unpleasant learning experiences is to pick up your feet a bit higher than you’d expect. The reason is obvious enough. Lifting your feet higher means you’re less likely to catch your foot on a rock or root. The extra height usually comes from lifting the knees, rather than kicking your lower leg forward or flexing your ankle to raise your toes.
As with the adjustments in mental awareness, you’ll find yourself gradually transitioning back toward a lower foot swing over time. This adaptation is natural and, from an efficiency standpoint, beneficial. Still, the most experienced trail runners switch to a higher foot swing when low lighting, poor visibility, or other obstructions limit their ability to see their footing.
Try the Pick-Up Game
Here’s a drill to help you attune to picking your feet up a little higher. Head to a yard or park and find half a dozen fallen logs or branches that stick up 3 to 4 inches (8 to 10 cm) when on the ground. Obstructions about 3 feet (1 m) long are ideal so you’ll have some width to cross the log or branch, but the item should be light enough to give way easily should you catch your foot. Drop these logs parallel to one another at approximately both arms’ length (5 to 6 feet [1.5 to 2 m]) apart on a soft, even surface (grass is perfect). Some variation in distance between the logs is helpful.
Now, go run the length of this branch-strewn path, crossing the branches. Run it a few times at an easy effort. Run it a few more times, varying your pace and starting point, such that you have to clear the logs at different points in your stride. If you’re catching your feet on the branches, adjust your stride by lifting your feet a bit more.
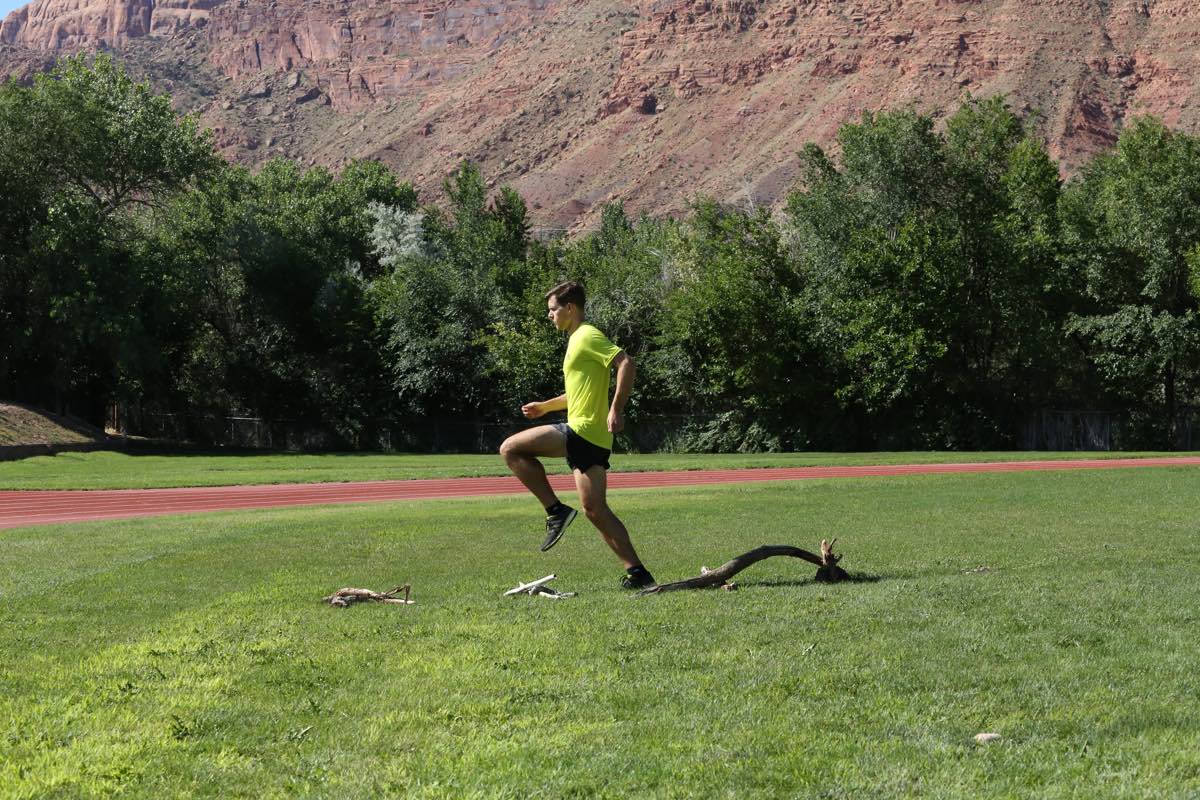
The Pick-Up Game. Photo: Human Kinetics/Kirsten Kortebein
Picking Up Your Cadence
In addition to picking up your feet, you’ll improve your trail running by picking up your cadence, at least occasionally, without necessarily picking up your pace. With a long, loping stride, you’re more committed to your path and less able to react to the obstacles that might be in it. With a shorter, quicker stride, you have many more chances to push off the ground to alter your body’s path. Physical therapist and trail running coach Joe Uhan notes that a quick stride also enhances energy conservation: “A quick stride rate allows for instantaneous energy transfer from the ground into the leg, then back to the ground. This quick energy reversal creates a plyometric effect wherein the muscle stores the energy only for an instant before releasing: like a bouncing ball.”
You don’t need to feel like a hummingbird out there, but modestly picking up your stride rate from 160 strides per minute to 180 strides per minute or more will make you more nimble. Likewise, a runner whose cadence is normally 180 strides per minute will be more agile at 200 strides per minute. This faster cadence is beneficial in a variety of situations, such as when the trail is strewn with obstacles or when obstacles come at you more quickly while running downhill.
According to Uhan, on most flat terrain, 180 strides per minute is ideal: “This allows for maximal energy storage (through a long, strong, hip-driven stride) yet is quick enough to pop off the ground. Any slower and that energy is absorbed by the muscles; too fast and the legs don’t achieve maximal range of motion.”
Uhan, however, advises a quicker stride rate on climbs and descents: “Upwards of 240 steps per minute might be ideal on the steepest, most technical terrain.”
Besides enabling you to pick your way through nature’s obstacle course, a quicker turnover is safer and more effective when the running surface becomes loose, uncertain, or slippery. In such circumstances, the smaller you can make your incremental changes in direction and speed, the better off you’ll be.
Naturally, you can resume your normal stride rate after the reason for picking it up has passed.
Try the Hot Feet Drill
Here’s another drill that’ll help you think about your cadence. Grab your shoes, a friend, and a stopwatch and step outside. You can complete this drill without outside assistance if you have a countdown timer with an alarm so that you can focus on counting rather than watching the timer.
Find an open, flat, obstacle-free area where you can easily run up to 200 yards without distraction. Start running at a comfortable pace. After you’re up to speed, have your friend say, “Go” as he or she hits start on the stopwatch. When your friend says go, continue running as you were, but start counting every time either your right or left foot hits the ground. Have your friend yell, “Stop” after 30 seconds. Multiply the number you counted by four to get your number of strides per minute.
Many folks come in at around 160 strides per minute. If you naturally hit 180 strides per minute, you’re in a sweet spot for trail running. If you’re much over 200 strides per minute, that’s quicker than needed for all but the steepest or most technical terrain.
No matter what your baseline stride rate was, try the drill again with a somewhat faster stride rate but with what feels like the same pace. Note what that feels like. Be ready to make a similar adjustment when a trail becomes more treacherous.
If you have difficulty adjusting to a faster turnover, download a metronome app on your phone and run in time to the beat.
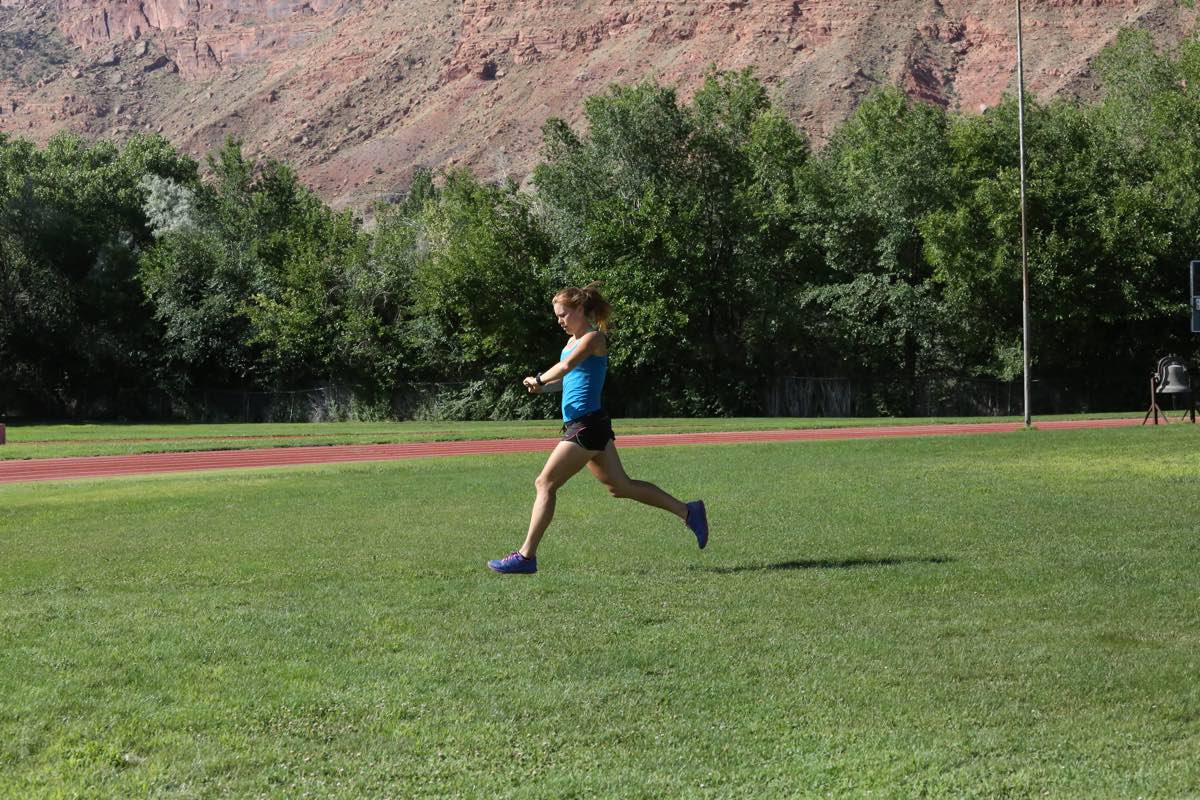
The Hot Feet Drill. Photo: Human Kinetics/Kirsten Kortebein
Be Ready
If you’ve played a ball sport such as baseball, softball, or tennis, you may remember being told to stand in the ready position. In this position, you were up on your toes, engaging your leg and core muscles, and putting yourself in a position to move as quickly as possible in any direction. Similarly, trail running requires that you be ready to react in any direction, and you’ll need to do so while you’re already moving. So how do you get into a ready position for trail running?
First you need to engage your core. To help get a feel for this, imagine that you’re surrounded by friends who are going to surprise you at random with pushes at shoulder height. Your goal in this exercise would be to keep standing as upright as possible. What happens? Your entire midsection firms up. It’s strong, stable, and able to respond to movement in any direction, just as you want to be able to do while trail running. If this mental exercise has you conjuring up yourself as an immovable mountain, relax, literally. You’ll want to be fluid and limber, not rigid, while trail running, but you will use all those muscles that you would use to brace yourself.
How exactly do you engage the core? The simple act of drawing the belly button in helps you get there. If you draw your belly button back toward your spine muscularly, not with your breath, you will be using one of the deeper abdominal muscles, the transversus abdominis. The transversus abdominis, along with a couple other deeper abdominal muscles, when engaged, will hold the pelvis and vertebrae in their natural positions.
In the imaginary bracing exercise discussed earlier, you may have also noticed that many of the muscles in your legs activate as well. These weren’t just the major propulsive muscles—the glutes, hamstrings, quadriceps, and calves. You may have noticed the front and side of your hips engaging. Likewise, the outside of both thighs energize. Each of the muscles in that muscular quiver is ready to fire in whichever direction your feet demand.
Your feet are your interface with the uneven, ever-changing ground around you. In running on an undulating surface, you’ll constantly have to ask different parts of your feet to do different things. For example, say you land on a small rock on your outer forefoot. The outer toes will need to relax and spread out around those rocks, whereas the big toe may need to engage more heavily than usual to support the body’s weight.
Now, take a step back. When you put the length of your body—your feet through your head—into action, think of standing upright in a straight, unbroken line. Now, take that straight line and bend forward a few degrees from your ankles. That stance is the general body position you’ll want to return to as you’re trail running.
As you negotiate obstacles and oscillations, your legs will go this way and that, while your arms and torso instinctively react as counterbalances. Afterward, bring yourself back into the active, ready position as soon as you can so that you’re ready for the next adjustment.
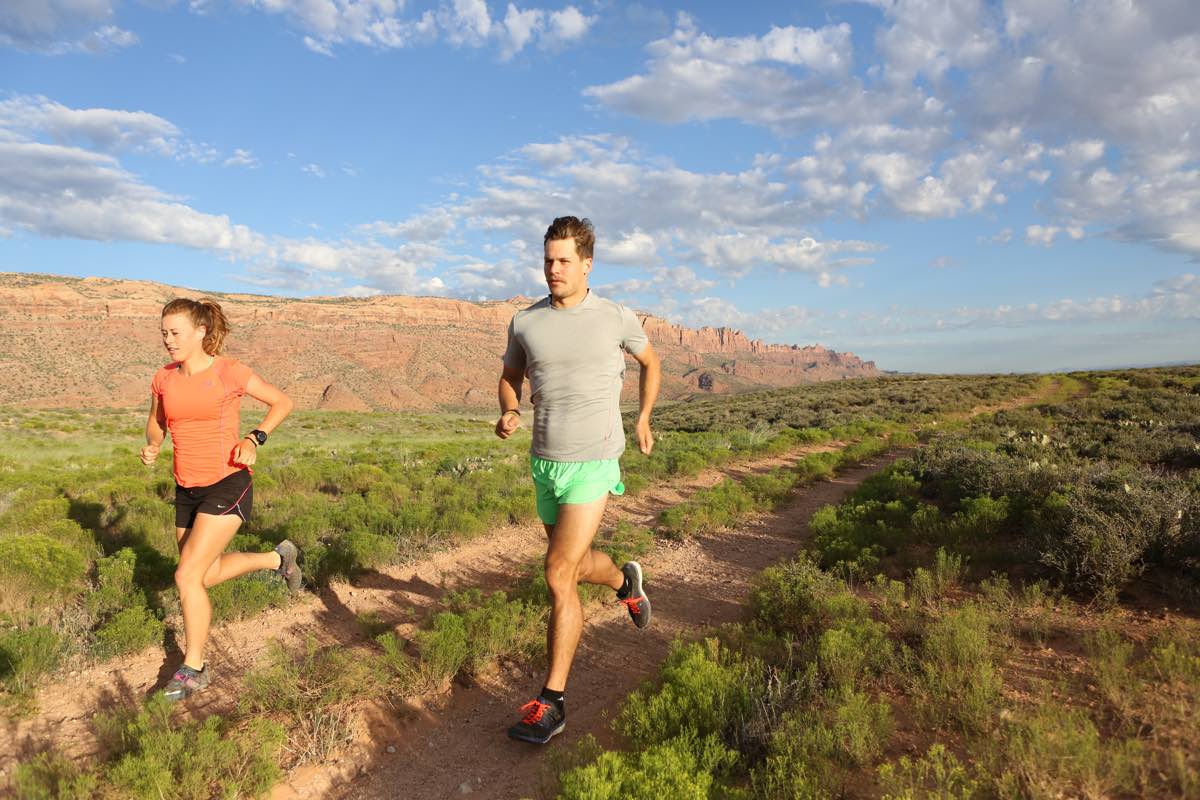
Trail runners are always ready for the next challenge on trails’ variable terrain. Photo: Human Kinetics/Kirsten Kortebein
Walk the Walk
It’s okay to walk. Yes, you read that correctly. Here’s a running guide that gives you permission to walk. If something feels too steep or rocky or muddy or whatever to run, walk it out. Sometimes slowing yourself down is the most efficient, not to mention most prudent, means of covering a given stretch of ground.
Although walking is all good, so is testing your limits, whether you’re out on one of your first trail runs or three decades into hitting the dirt. You’ll often find that what you once thought was unrunnable has become a new running playground. This transformation is one of the gifts of trail running.
Excerpted from Where the Road Ends: A Guide to Trail Running, by Meghan Hicks and Bryon Powell. Human Kinetics © 2016.
Call for Comments
- If you have switched to trail running from road running, what are some of the differences you’ve noticed about running on the trails?
- What do you think are the key parts of an effective trail runner’s body?
